Showing posts with label Customizing. Show all posts

Sunday, May 12, 2019

I'll fly like an eagle...

...To where I belong.
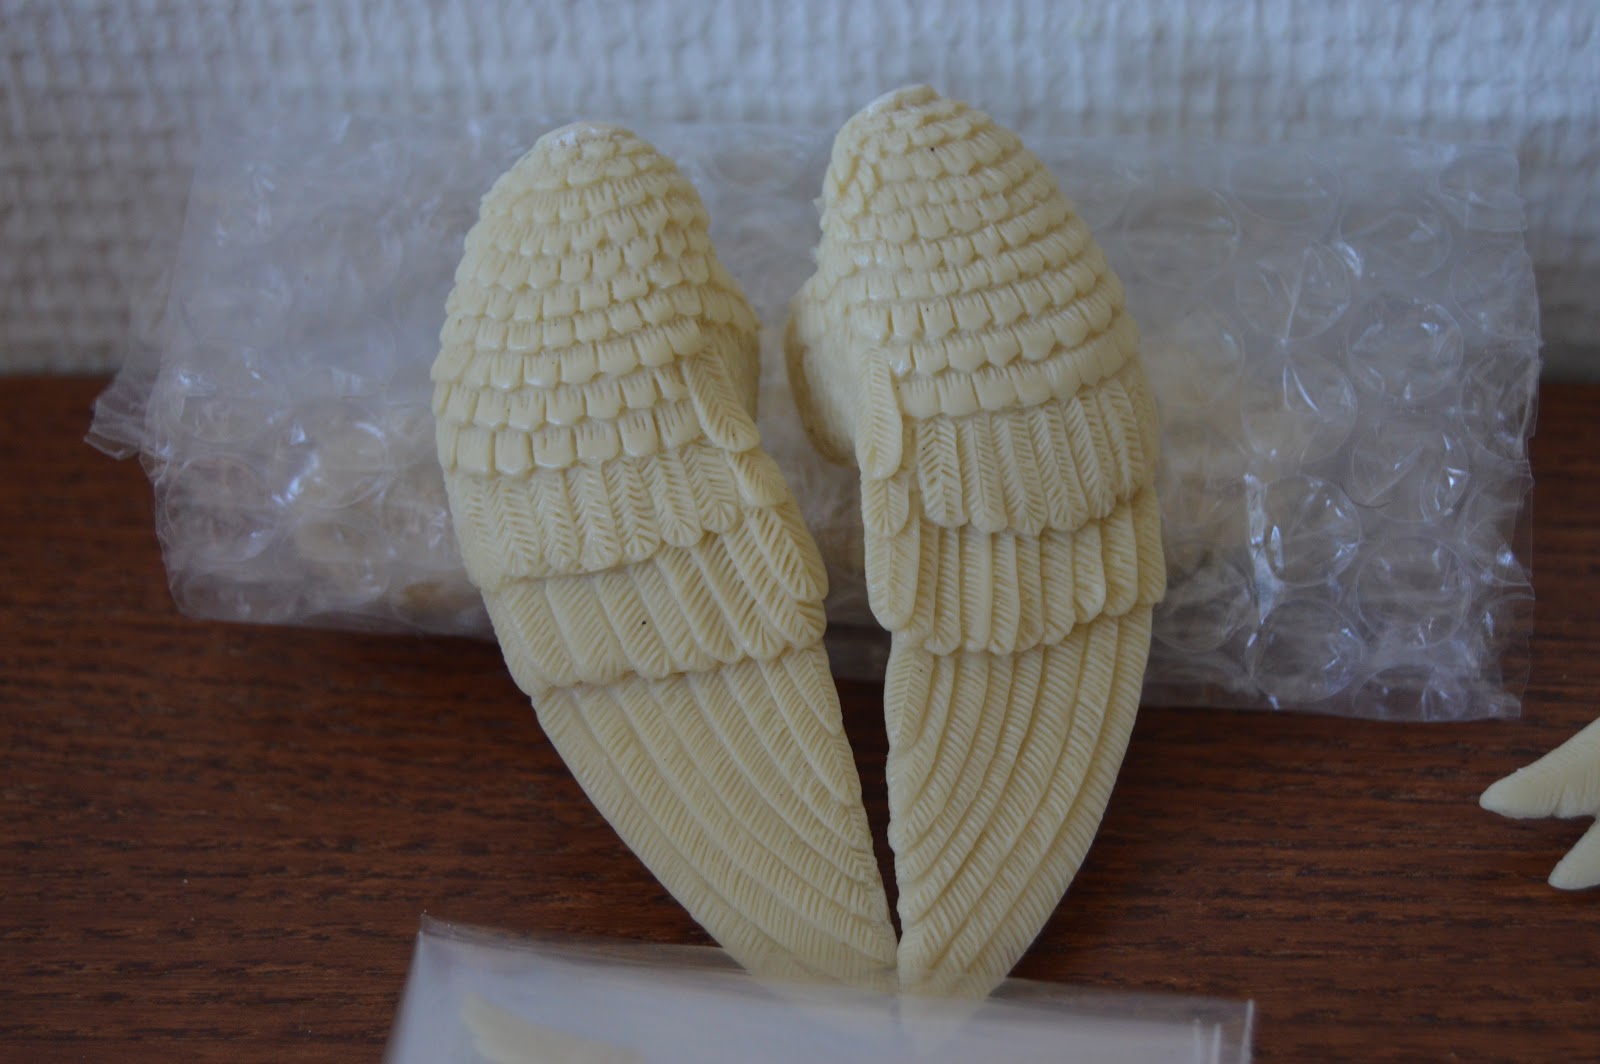
Okay, I might have been listening a bit too much to the Spirit: Stallion of the Cimarron soundtrack in the past few days but I thought the line was quite fitting for a post about all the resin wings I recently bought from Abbeyinc studios.

I am normally not a huge fan of Fantasy models but they have grown on me, quite a bit. Winged fantasy models or unicorns are usually the ones that speaks to me more than others and I have been wanting to try my hands a customizing a few fantasy models of my own.


I have always been interested in the wings from Abbeyinc Studios as I have seen a few customs made with them and they always look so detailed in pictures so finally I got my act yogether and ordered some wings.

Pony wings
 I have yet to decide what to do with most of the wings but I thought, with postage, customs and shipping time, I might as well stock up a bit on wings.

Tiny Wings
So I ended up buying two pairs of all the wings for myself, and a pair of tiny wings and bat wings for my boyfriend.

Folded Wings
At the moment I think the folded wings might be my favourites but we'll see when I get to put them on some horses.

Curvy Wings
The tiny wings are absolutely adorable and I think they will be perfect to put on a foal.

Bat Wings
I already have some plans for the bat wings so I'll have to start prepping them soon.

Tuesday, September 25, 2018

Bits and pieces

Like I mentioned in my last post, just because I haven't blogged, doesn't mean that nothing has happened with the models.

This little girl finally got her old paint stripped off. I bought her a few years ago with the intentions of stripping (with the former painters permission) and repainting her. I have yet to decide on a colour as contrary to some believes Fjords do actually come in quite the variety of colours and shades. I am leaning towards a Gulblack (Palomino Dun), Rödblack (Red Dun), Gråblack (Black Dun) or Ljusbrunblack (Light Bay Dun) in that order 😊. But we'll see what she'll end up as the day I decide to paint her.


Next up is a model I bought who had already had some things done to her. I believe her name is Dual (if I remember correctly) and I have quite some plans for her. She had already had her mane removed by previous owner (and the base is by her too).


I have started to sculpt on her mane, which will be braided. In the future I also plan to fix some things in her tail and when done I think I'd like to try my hand at painting her Silver Bay, but that might change as it will be quite some time before she'll be ready.


I have also worked a little bit more on the tack for Nazar. I have yet to put on some decorative stones on the circular plates of the tack but I'm having a hard time deciding on colours... The plan is to give him a saddle and breast collar as well but that might also be some time before I'll manage to do so as a few other plans needed to be put into action before that.


Sunday, February 4, 2018

Round and round we go

It kind of feels like I am running in circles with my NaMoPaiMo model. I prep and sand, thinks that I might be finished and gives him a spray of primer.

Just to realize more areas that need work...


I sand and fix the areas I've found, give him a bath, let him dry and gives him another coat of primer.

And yet again I find some other areas that need work.... Sigh... I have lost count on how many rounds of this I've done... I thought I was done with this several days ago...

But by now I am done and he's had his last layer of primer on so I will start painting later today.

I barely recognize him from when he came to me! But I've but a whole lot of hours into him already and I don't think I've ever sanded this much on a model! 

When I recieved him.
What he looks like now (pardon the waterdrops he just had his final bath)
Can't wait to get some paint on this guy and hope I can do him justice!

Wednesday, January 24, 2018

Slowly getting there

My previously tail-less Akhal-Teke is slowly progressing. With the help of two tutorials by Laura Skillern and re-posted on Jennifer's blog I took the plunge and tried my hands at sculpting my first traditional tail.

I had my boyfriend help me drill two holes in my poor ponies backend so that I could attach to wires. I then strengthened the bond with superglue and baking soda. After that I took masking tape and put over the wires, drew out the shape of the tail that I was aiming for and cut it out.

Unfortunately I was too into what I was doing so I actually forgot to take pictures of the earlier stages.
 After cutting out the shape I strengthened the tape on both sides with baking soda and superglue. I than started putting on snakes of apoxie.

Half of the back of the tail.

Whole back of the tail.
 I then smoothed out the snakes a bit with water:


And smoothed a bit more with water:


Then came the tedious work of sculpting in all the hair detail.
750:-
 

 It took me about 3 episodes of Supernatural to finish the tail and in the end the apoxie was almost a bit too hard to work with so I'll try to be faster next time.


I still need to finish the underside of the tail but as I almost smooshed the details working on one side I didn't dare to work on the underside before this side has dried fully so I won't destroy it.


I am quite happy with the look of the tail so far (especially for being my first try at a traditional tail)!

Sunday, January 21, 2018

NaMoPaiMo Sign Up!

I entered NaMoPaiMo last year. Unfortunately I didn't manage to finish in time. But that doesn't mean that I won't try again this year! And this year, I have chosen an even bigger challenge than last year...


 I consider my experience level to be intermediate, I have painted some models before (I managed to finish 15 last year) and some has done quite well in shows (depending on competition) but I still have a lot to learn and quite some way to go before I'd consider myself advanced!

My model of choice this year is the Horsing Around Akhal-Teke Stallion sculpted by Sue Thompson. He came to me in quite bad condition so he'll have a whole lot of work that needs to be done before I can start painting him. I'm not even sure that I'll manage to have him prepped and primed in time for February 1st.

I plan to paint him Chestnut with lots of chrome as that is a colour I seldom see on Akhal-Teke models. Most of the akhal-teke models I've seen are usually painted in some shade of dilute or double dilute so I wanted to do something a little different.

The mediums I'll use are acrylics, pastels and maybe some coloured pencils for details and maybe some pearl-ex/mica powder/eyeshadow to achieve the certain "glow" that is often seen in Akhal-Tekes.

The biggest challenges with this project is the size. I have never painted anything bigger than little bit scale before. There is also the extensive prepping and sculpting needed to make him ready to paint. Also, chestnut is my favourite horse colour and I usually struggle to get a shade of chestnut that I really like. Next there is the white markings which will provide a challenge when it comes to keeping them smooth.


My goals during NaMoPaiMo this year (except to finish him, preferably in time!) is to try to come as close to the picture I have of him in my head. My other goals is to finish a few more models, some for the giveaway I plan on hosting for reaching  50 000 views and some as donations for a show.

It'll be fun to see how far I'll get, I hope to be able to finish him in a month but I will not rush as me being satisfied with what I've achieved, to have had fun and to have learned from this experience is far more important than finishing in time.

Friday, September 22, 2017

A little bit of everything

At the moment I have a really hard time sticking to just one project. So at the moment I have a few different ones simultaneously in the works.

My "stable" has had the inside painted:


I also managed to put in the bars over the window:


I've also started removing some ears and manes on a few poor models, preparing them for some resculpting.


I also did a tiny bit of painting:


I just blocked in the mane and tail so that I get a better feeling for how dark the body colour really gets as I have some layers left on it.


Pardon the bad picture (and messy table). This is Tambo for my Silver Brumby project who has gotten his markings started.

It's nice to see some projects moving forward!

Sunday, May 7, 2017

Friesians finished

Since I brought my boyfriend (who is not a horse person) to the Swedish Nationals Performance show he has had ideas on making an entry of his own. And he didn't plan to start easily. He wanted to make a four in hand driving entry. In stablemate scale... That meant he needed four horses.

He also had quite the vision on how they would look. He wanted 4 Friesians with long manes and he wanted me to do them as he is not a horse person.


So I bought 4 Breyer Sm. G3 friesians and got to work. After removing the original mane and forelock I also decided to remove the original ears as they looked too long and too narrow from the front. Then I started sculpting the mane. The thing about the long mane is that my boyfriend needed it to be slightly lifted of the body so that he could slid the harness in under it.


I then painted them in a few layers of burnt umber acrylics and then started working in pastels. The last few layers wore in solid black pastels while the other layers had been a mixture of browns and blacks. They do look a tad plain in some lights but that was not my choice. I wanted to stop a few layers earlier when I still had some nice dark browish undertones still shining through in some places but my boyfriend wanted them to look even more black so they got a few more layers. The brown shading is still seen a little bit in certain lights. But as long as the customer is happy, I am too 😋.

The sealer barely had time to dry before my boyfriend started dressing up the first horse so I had no time to take a picture of it without tack.


 And the second harness is in the works so no pictures of the second horse without tack either 😋


I can't wait to see them all tacked up! (By the way the harnesses and wagon is all made by my boyfriend. I think he's done a great job considering he is not a horse person and this is his first try!)


These horses are the third, fourth, fifth and sixth horses I have finished painting this year! I might even manage to meet my goal 😊

Wednesday, February 15, 2017

In the spirit of NaMoPaiMo

In the spirit of NaMoPaiMo I've prepared several other models for painting. Mostly prepping and priming but some slight resculpting on some has also been done.

The two guys below are CollectA Hanoverians and will be painted dark chestnut and buckskin going grey.


These three girls are planned to be medium-dark dapple grey, dark bay and bay leopard or blanket.


This little shire foal will be baby black.


I gave this thoroughbred boy-parts and he will be a buckskin dominant white.


These two girls will be silver bay and chestnut perhaps with rabicano-like markings.


This guy is still undecided but I think I might resculpt his ears a bit as I'm not too keen on their look.


This tiger mommy will be painted a white tiger.


Her cubs have had some work done. They were separated from each other and the cub below got a new tail sculpted. This one will be painted as a white tiger.


The next cub got his back lower leg and paw sculpted. Will be painted in "normal" tiger colour.


And the last cub got both back lower legs and paws sculpted. This one will be painted as a golden tiger.


This is what they originally looked like:


As you can see they are all molded together.


Here's the first cub original vs. separated with new tail.


Here's the second cub, separated with sculpted back leg and paw vs. original.


And last but not least, the last cub with his "middle" counterpart.


Can't wait to get some paint on these guys!

Wednesday, May 11, 2016

End of the tails

I finally managed to sculpt the last tails and now it's time for prepping and priming :)


I'm quite happy with the tail of this guy. It's not perfect but I think it's the best one I've done so far.


I'm not quite sure about the tail on this guy but he'll keep it as it is and hopefully it'll look better when painted.


This girl's tail got a bit fuller and I like it better now.


This girl needs a bit more sanding and priming before painting.


This guy will probably only need one or two more coats of primer before painting :)