Thursday, February 28, 2019

I DID IT!

I am so, so happy! I didn't think that I would actually manage to finish in time with the struggles that turned up late in the game, but I did!


I am quite happy with how she turned out. Especially her eyes and mottling.


Her whites could've been smoother but I think it's at least a bit of an improvement to my former horses so I will keep working on my technique on future horses.


She also got the characteristic striped hooves.


And white sclera on the eyes.


Her blanket pattern turned out okay.


Especially for being my first appaloosa, I would say.


She has a very sweet face.


I really, really like the colour of her eyes! 


And also the shape of her stripe.


All in all, I am quite happy with what I manged to do, even though I definitely did not expect to be on #TeamLastMinute as I painted on her every day but one this month! 


When I was taking her pictures I just had to bring out my other NaMoPaiMo models from previous years.


The big Akhal-Teke, Nazar, was my NaMoPaiMo model for last year, which I also managed to paint in time. The small stablemate custom was my NaMoPaiMo model for 2017. Unfortunately I didn't manage to finish him in time, as he was finished just a few weeks after NaMoPaiMo.


I quite like this trio and think that I can see some improvement with every piece.

Wednesday, February 27, 2019

Trouble in paradise

I kept on layering, and layering, the whites of the blanket on my NaMoPaiMo pony. And I actually started to like the way she was looking and had high hopes I might even finish in time.


I let the acrylics of the blanket dry and then I decided to spray a layer of sealer on it so that I could do the mapping.

And that's were things started to go wrong. I am not sure why but the white paint of the blanket started cracking, in several places, making small gashes in the white. I also managed to spray a little to much sealer on so I got a drip on her right side.

I was very bummed about the cracking but thought that I could fix the drip when she was dry again. When I thought she was dry, I started to sand on the drip. Apparently she wasn't completely dry and I managed to take of her paint almost all the way down to the primer.


No I was really, really bummed! I actually liked the horse and thought I could finish her in time.


I am still working on her and hope that I might be able to fix her, although whether or not that will be in time for NaMoPaiMo, I don't know at the moment. But I'll keep trying!

Tuesday, February 26, 2019

Start of the blanket

It has been a bit quiet from me regarding my NaMoPaiMo pony. We have had our fair share of struggles and my plans on documenting her progress layer by layer has gone down the drain. At the moment I am happy if I even finish her.

These photos are from a few days ago.

I started mapping out the blanket and white markings with pencil and then I added on a layer of Titanium White PanPastels.


I wasn't sure if I liked the look but I tried to stick fairly close to my reference pictures. I decided to go for it but added a few smaller spots for some variety.
 

I haven't been around many blanket appaloosas IRL so I was not sure how their spots look on the back but I think I got an okay pattern.


Next up; endless layer of white. I was NOT looking forward to that.


Monday, February 18, 2019

NaMoPaiMo progress

My plan didn't work out as I had hoped. I had hoped to have the body colour done so that I could start the white markings on the 14th. But I had to work out some kinks with the shading on the muscles on her right side and a small area of darker paint on her left side.

4 days late but today I managed to finish the body colour! Now I just need to figure out what facial and leg markings I want. And of course, work up the courage to start on the blanket!


I quite like the colour I achieved and hopefully I won't ruin it with the blanket!


On a different note, this is my 400th post! It was a bit of surprise to me that I have written 400 posts but I enjoy blogging about my hobby and hope to keep up with it throughout the years!

Sunday, February 10, 2019

Weekend work

My goal for this weekend (Friday evening to Sunday) was to get at least 6 layers of pastels on my horse.

Friday:
I had another long day at work, working a bit of overtime so was a bit tired when I got home but a nice dinner later I actually made some progress.

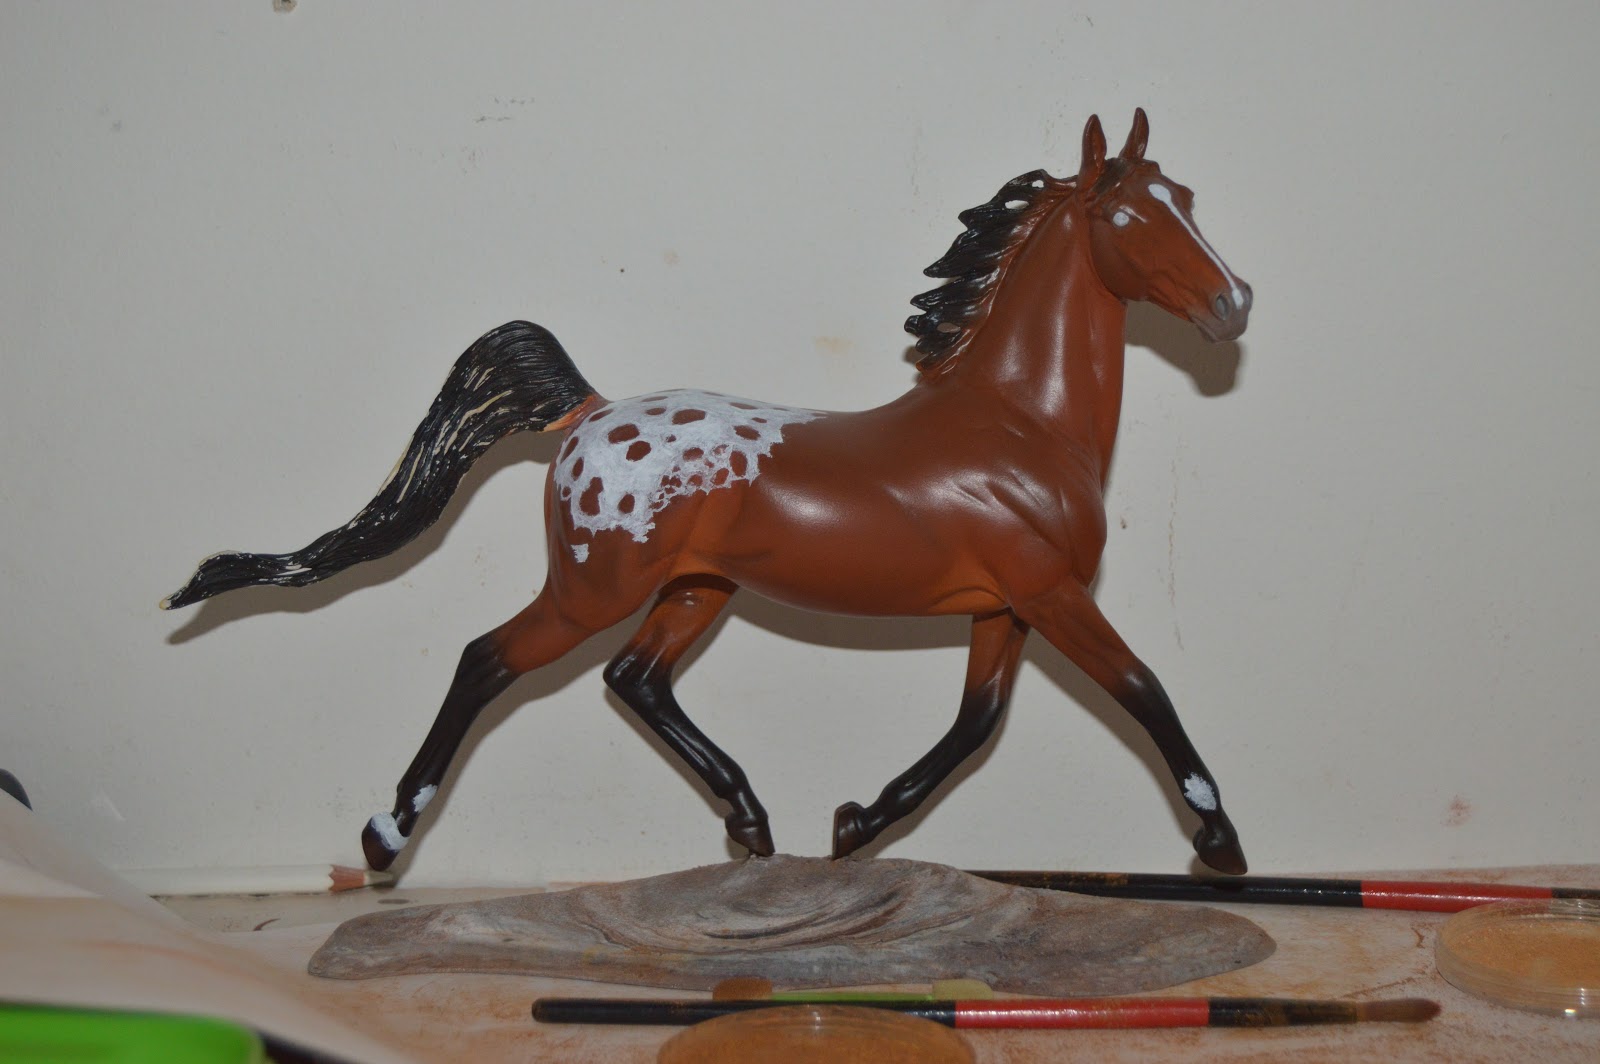
Sixth layer of pastels: 50/50 mix of yellow ochre and burnt sienna. 
After sealing my first layer of the evening I found a cat hair in my paint job! I was so bummed and a bit uncertain of what to do. But I decided to wait until the sealer was dry as I think I remember reading that touching wet sealer might lift underlying layers of pastels and I didn't want a bald patch at the base of her neck.
Black hair at the base of her neck.
Fortunately the hair wasn't sealed in so I managed to grab a small piece of the hair that was sticking out and managed to pull it off with no damage! Sometimes luck is really on my side!

Since my horse still is a little grainy I tried to switch sealer to see if I could make it less grainy (therefore she might look a little more semi-gloss in the next pictures).


Seventh layer of pastels: 50/50 mix of yellow ochre and burnt sienna.
The colour is progressing in a direction I agree with but she is still a tiny bit grainy so a few more layers before I can start darken her again is probably needed.

Eighth layer of pastels: 50/50 mix of yellow ochre and burnt sienna.
So far I have managed to do three out of the six layers I hoped to be able to put on this weekend so hopefully I will be able to put on a few more than I hoped!

Saturday:
I put on another layer in the morning with the same mix as yesterday but forgot to take a picture of it... Anyway she is still a tiny bit grainy in some places but I decided to give her a good spray with the sealer and start on the darker colour.

Ninth layer of Pastels: 50/50 mix of yellow ochre and burnt sienna.

After doing a bunch of errands and chores I got home and put on another layer, this time a little darker. Apparently I am slacking of with the taking pictures of each layer as I missed out on taking pictures of both the 9th and 10th layer...

Tenth layer of Pastels: 1 part yellow ochre, 1 part burnt sienna and 1/3 part of burnt sienna shade.

I didn't see too much colour difference on the last layer so I decided to take a little more burnt sienna shade into the mix.

Eleventh layer of Pastels: 1 part yellow ochre, 1 part burnt sienna and approx. 2/3 part burnt sienna shade on the body and straight burnt sienna shade on the legs.
This new mix actually made some difference on the body and I think I'll stick to this mix for a few more layers.

Twelfth layer of Pastels: 1 part yellow ochre, 1 part burnt sienna and approx. 2/3 part burnt sienna shade. Red Iron oxide extra dark on the legs.
Thirteenth layer of Pastels: 1 part yellow ochre, 1 part burnt sienna and approx. 2/3 part burnt sienna shade. Red Iron oxide extra dark on the legs.
I am very happy to say that by Saturday evening I have managed to paint 7 layers of pastels this weekend and I am quite happy with where she is going at the moment

Sunday:
Kept on going with the same mixture as yesterday but forgot to take a picture of the fourteenth layer of pastels.

Fifteenth layer of pastels: Same mixture as yesterday but put on a layer of black on the legs.


After the Fifteenth layer I decided to block in the mane and tail. I have a bit of a problem with going too dark on my models and I find that blocking in the colour helps a bit so I see when it starts getting too dark.


Sixteenth layer of pastels: Since the grain doesn't want to play nice I decided to break out some of my old pastels in a lighter colour and give her some layers of that as I got that tip last year and it worked great on Nazar. Unfortunately, I forgot to take a picture of this layer.

For the seventeenth layer of Pastels I did some "detail work" I put on another layer of grey on her muzzle and eyes. Another coat of black on her legs and some Red Iron Oxide Extra Dark to shade her muscle groves. It looks a little rough at the moment but will blend in better with a few more layers of lighter pastel. I also mixed in some more Burnt Sienna shade and some Red Iron Oxide Extra Dark into the body colour and put a layer on her topline. She is starting to look closer and closer to being finished.


The Eighteenth layer was done in the same fashion as the seventeenth except that I didn't add anymore grey this layer.


I am very, very pleased with how far I got this weekend and hopefully I can keep it up this coming week.

My next goal is to have her coat colour finished by the 14th. That way I will have an entire two weeks to finish her blanket, markings and details. Hopefully that will be enough!

Thursday, February 7, 2019

Fourth, fifth and sixth day of NaMoPaiMo

Day 4:
Believe it or not! My PanPastels actually arrived today! Very unexpected. I decided to try them out immediately.


I, unfortunately, had to work overtime and then I had to do some errands and chores before I could get to try them out. That way I only had time to do one layer.

First layer of PanPastels: Yellow Ochre on the body, burnt sienna on the lower legs and neutral grey on nose, eyes and genitalia.

Day 5:
I realized the PanPastels were far more pigmented than the pastels I am used to using and that my horse ended up to yellow ochre after the last layer and I decided to try and take it down a notch with a layer of Titanium White pastels.

Second layer of PanPastels: Titanium White all over body.
It worked well, maybe a little bit too well. She almost looked like a roan before I got the white on her face. But it helped taking the yellow down.

Third layer of PanPastels. A mix of white, yellow ochre and burnt sienna on body. Neutral grey on nose, eyes and genitals. Burnt Sienna on lower legs.
I then mixed a new batch that matched my reference photo better and started again.

Day 6:
Working the late shift at work so I didn't have a whole lot of time to paint but I got to start darken her colour gradually.

Fourth layer of PanPastels: a mix of yellow ochre and burnt sienna on body.

Day 7: 
I wasn't going to paint anything today. I was tired from work and didn't feel like painting but then I read this post on the Braymere blog and decided to at least do one layer. I did. The mix is the same as yesterday and right now my horse has gotten a bit grainy, but I am fairly certain that this will work out with a few more layers of the mix.

Fifth layer of PanPastels: A mix of yellow ochre and burnt sienna on body.

I am quite happy with where her colour is going at the moment and I think I might need about two to three more layers with this mix before going darker again. Hopefully I can get at least 5 or 6 layers on this weekend.

Monday, February 4, 2019

Remember this girl?

This poor little girl has been in the works for almost 1 and a half year by now. I wanted to finish her in time for a live show by then but never managed to finish her so she got started on and then put back in the cabinet. Some time later I took her out again, this time with the intentions of finishing her in time for the Swedish Nationals 2018.

She actually cooperated quite well and quickly went from this:


To this:


And it actually looked like I would be able to finish her in time. Unfortunately, she fell not too long after the picture was taken (some two weeks before the show I believe) and lost a piece of her ear. I was so bummed and even though I managed to find the piece and put her back together I just couldn't make myself finish her in time with the new repair work so back on the shelf she went.

Yesterday I took her back out and looked her over. I sat down and started to plan for fixing the seam where the formerly lost piece is attached. So maybe she will be another side project for NaMoPaiMo so she can finally be finished.

Sunday, February 3, 2019

Third day of NaMoPaiMo

On the third day of NaMoPaiMo I painted 3 more layers of acrylics.

She still looks a little bit streaky but it evens out with each layer.

Third layer of acrylics: Yellow ochre + a touch of raw sienna (same mix as the previous two layers but new batch)

Fourth layer of acrylics: Yellow ochre + a touch of raw sienna (same batch as layer 3)

Fifth layer of acrylics: Yellow ochre
I now consider the acrylic base coat finished, I don't need it to be perfectly even as it will even out with the pastels, I just want my horse to be pretty even in colour so that I won't get too much difference in the colour when applying pastels.

If I would be really, really lucky my PanPastels could arrive tomorrow. But I am probably not that lucky and besides a package I got last week was supposed to be delivered Tuesday or Wednesday at the latest (according to the Postoffice) but it arrived Thursday. So even though my PanPastels would technically be able to be here Tuesday I might not have them until later in the week...

Saturday, February 2, 2019

Second day of NaMoPaiMo


Today might be the second day of NaMoPaiMo but it is my first day of painting as I spent yesterday fixing the last couple of issues on my primed model (mostly stray bits of hardened primer as my primer decided to start spitting on my NaMoPaiMo model... I primed like 15 models in a batch but it only spit on my NaMoPaiMo horse and one other...)

Anyway, I work in pastels and I learned the hard way just how many layers you need when building up pastels from you white primer coat. So I find doing a base coat in acrylics saves my time (and sanity!) 

I am currently waiting for my PanPastels, which are due to arrive at the end of next week. So for the time being, I am focusing on my acrylic basecoat.

I like to start with one of the lighter colours I can see on my reference picture and then work my way up from there.

Today I managed to paint two layers of acrylics.


First layer: Acrylics, yellow ochre with a touch of raw sienna.

Second layer: Acrylics, same mix as the first layer.
Tomorrow, my plan is to finish the acrylic base coat and then I'll have to wait for my PanPastels to arrive.

I also started base coating two other models who are both destined to be bay and might be my side projects for NaMoPaiMo.


Friday, February 1, 2019

Down the rabbit hole?

I am not a clinky collector. Mostly because I'm a bit clumsy and because I am extremely terrified of breaking them.

I have crossed the line quite a while ago when I bought a Lakeshore Houdini model but that is the only clinky model in my collection. Or, more correctly, he was the only clinky in my collection.

Yesterday another clinky arrived, after a bit of waiting.


This guy is an Animal Artistry Earthenware SR for the Swedish Model Horse Show "Waterfestival Liveshow". The model is called Davy Jones and Calypso and when I saw the sketches of the to-be-special-run I decided that I wanted one! And when I saw the first picture of the prototype I was even more sure. 

I just LOVE his blue eye!

I bought him and had intentions of picking him up at the show. Unfortunately the models were a bit lighter and more dappled than the prototype showed and I got the choice to take one of the lighter ones or wait for a darker one as they were being sent back to Animal Artistry to be made a little darker. The lighter ones were really, really nice but I wanted mine a bit darker as it was partly the darker shade that drew me into him. So I decided to wait.

And I am so glad I did! I got pictures of several of the darker models and got to chose the one I liked the best. When I unpacked him yesterday I was almost speechless! He is absolutely gorgeous. And the details! And the cat! I haven't been this awed by a model horse in quite some time!

His adorable little companion, who also needs a name.

When holding him in my hands I had a thought that clinkies might not be so bad after all... I think I need to start telling myself that I am NOT a clinky collector, otherwise I can absolutely see that a few more could happen to find their way home to me.


I have yet to assign him a name and a breed but I want it to be something special as I really, really liked him, so it might take a while to figure that out.

I am not a clinky collector, I am not a clinky collector...